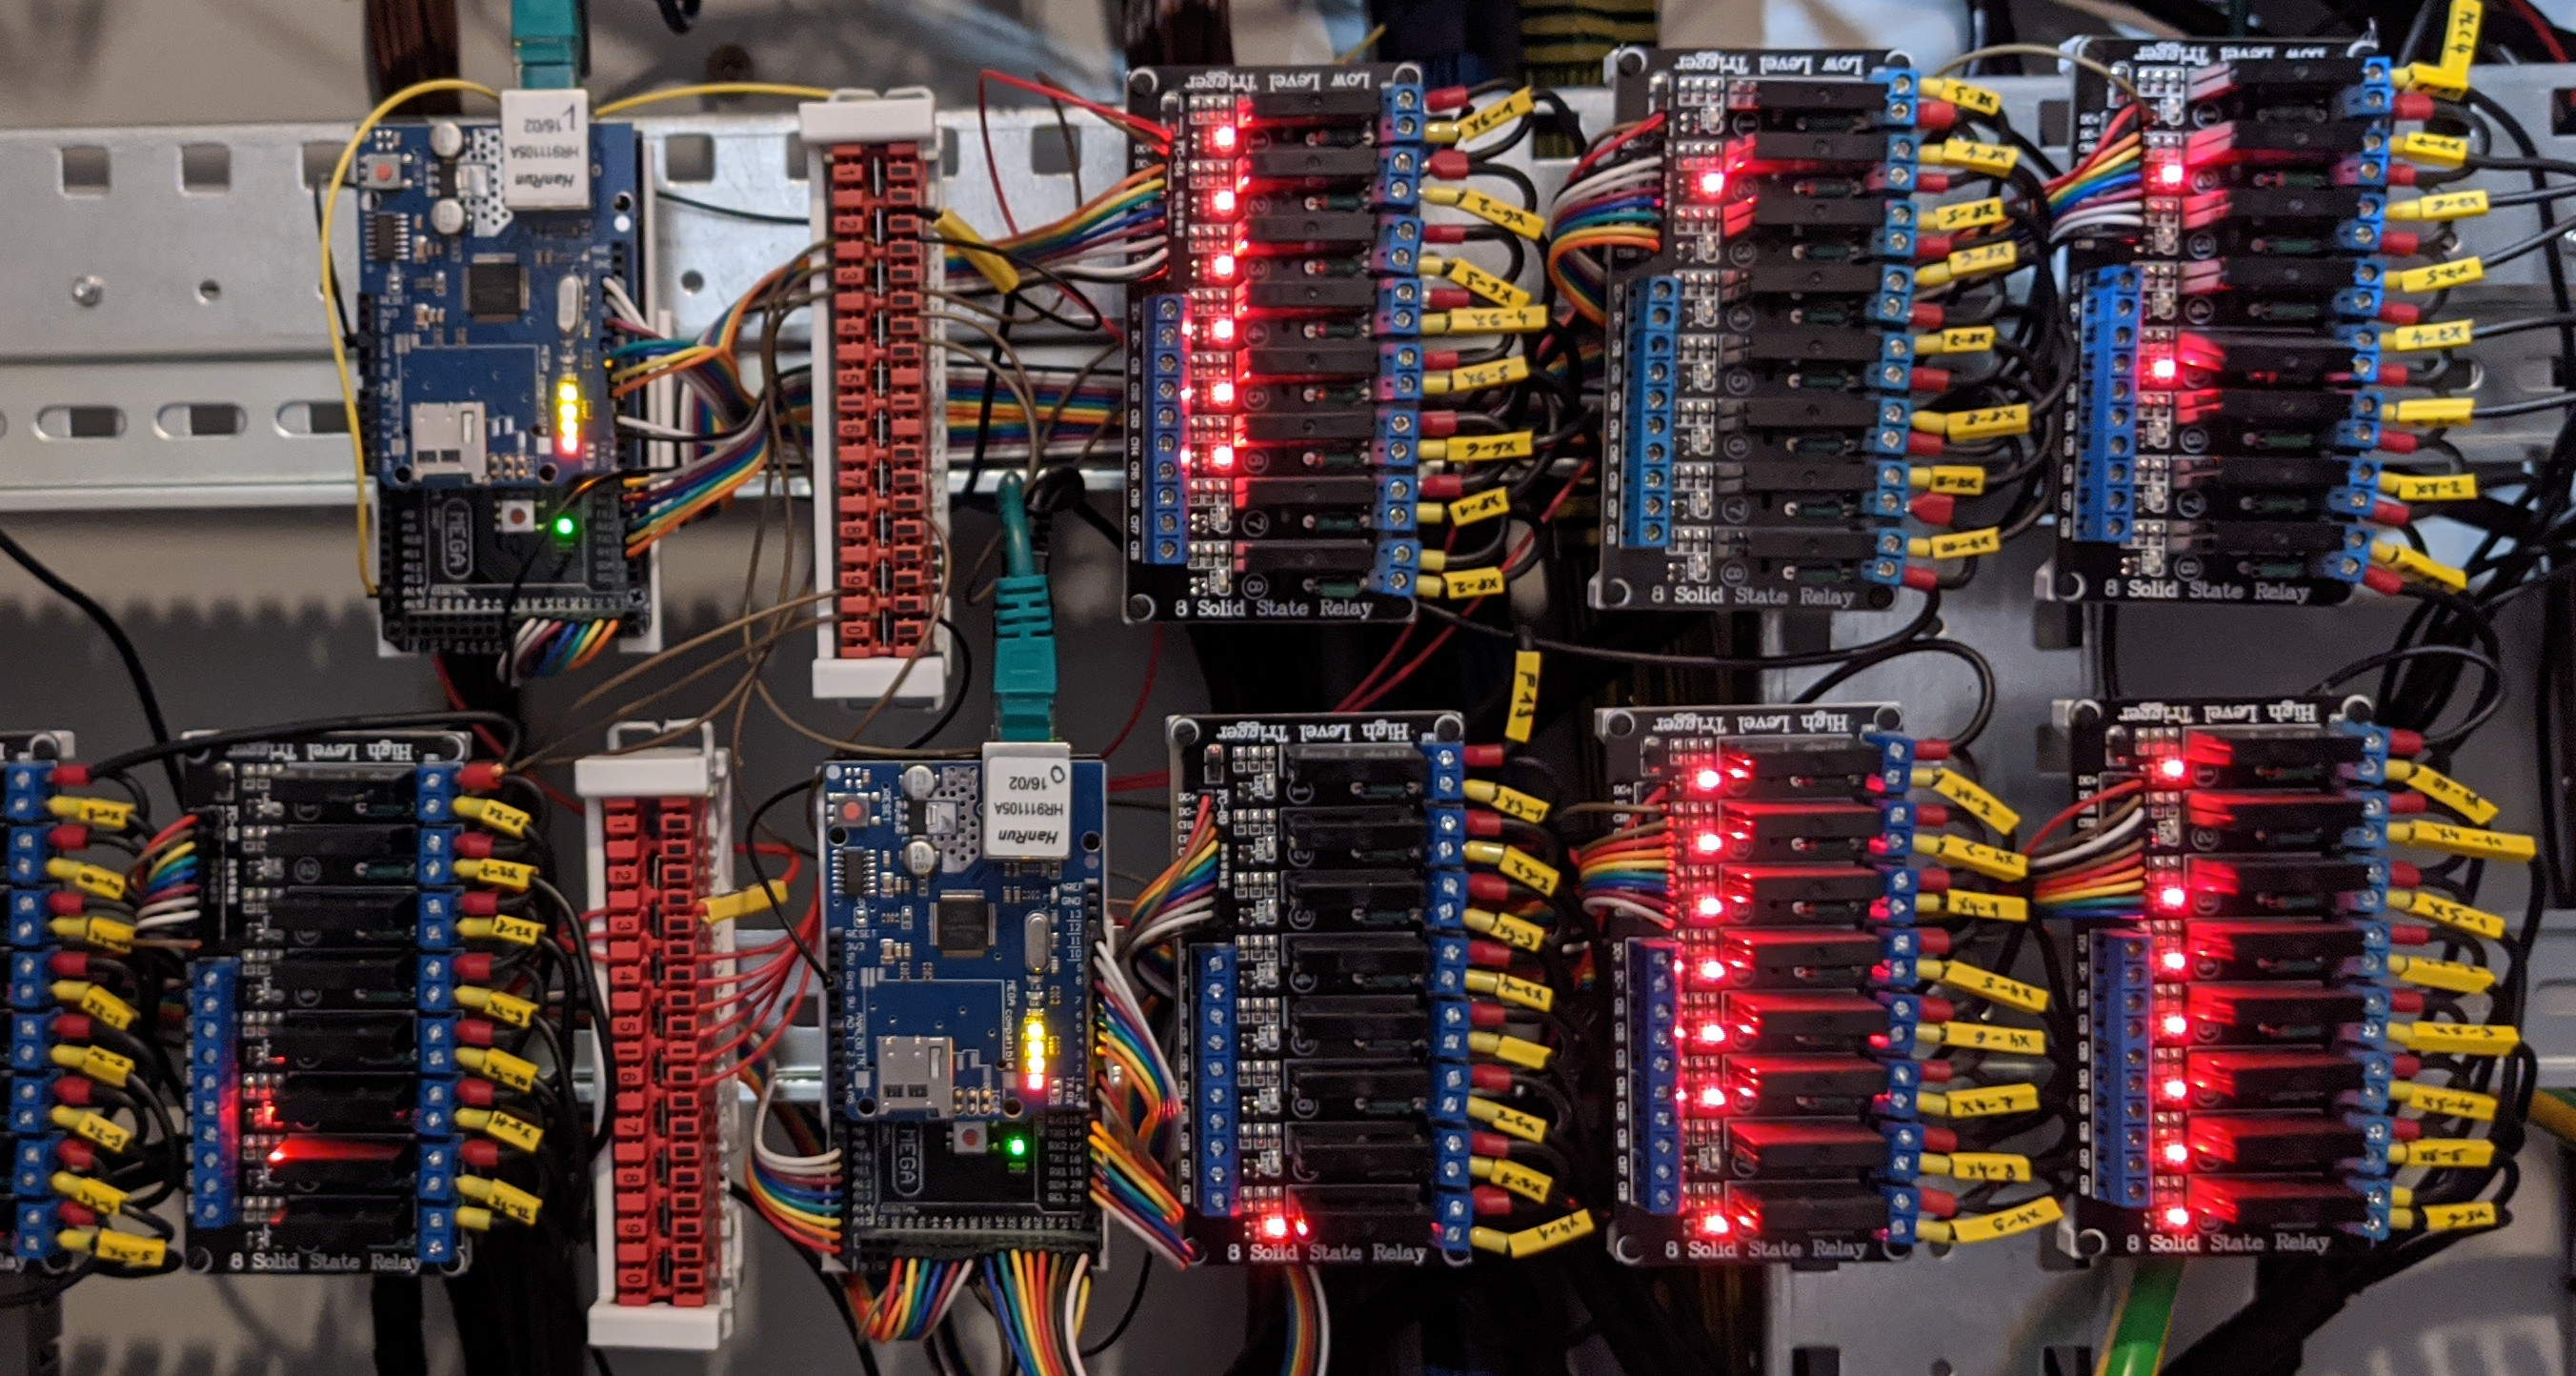
Na Arduinech stojí veškerá ovladatelnost domu. Jsou propojené do LAN sítě prostřednictvím Ethernet Board a komunikují s OpenHAB výhradně přes MQTT. Aktuálně v domě používáme desky Arduino Mega a celkem je jich zatím v rozvaděči 6. A to: 2 pro spínání relé (světla+zásuvky+žaluzie), 1 pro vypínače, 1 pro čidla pohybu+alarm, 1 pro senzory - teplota, vlhkost, kouř, atd., 1 rezerva. Veškeré příklady sketchů najdete v celém článku.
Pokud si chcete jenom hrát, pořiďte si levný klon klasického Arduina nebo Arduina Mega. V reálne instalaci nešetřete každou korunu (už jste ušetřili dost oproti komerčním řešením) a sáhněte po originálu desku Arduino už jen z principu odměny výrobce této skvělé otevřené desky.
Zapojení
Ideální je si vytisknout nebo koupit výtisk držáků pro Arduino Mega na DIN lištu. Arduino je propojeno (a napájeno) z USB hubu s externím napájením a tlačítkem on/off pro každé USB. Stačí tady bohatě USB 2.0. Dále je připojeno do LAN sítě a každé Arduino má naprogramovanou vlastní MAC a IP adresu. USB hub je propojen také s RPi, na kterém běží OpenHAB. OpenHAB je také napájený tímto USB hubem, takže na zapnutí 1 RPi a 6x Arduino stačí jeden USB HUB o 8 portech. OpenHAB je zároveň schopen uploadovat "sketch" přes USB do specifického Arduina, takže programování probíhá vzdáleně přes SSH.
Práce s Arduinem
Na RPi, kde nám běží OpenHAB, nainstalujeme (pokud jsme již neprovedli před tím) utilitu schopnou uploadovat sketche do Arduina a upravíme nastavení pro daného uživatele. V tomto případě uživatel "pi".
sudo apt-get install arduino-core arduino-mksudo usermod -a -G dialout pi
V domovském adresáři /home/user/ si vytvořte adresáře se specifickým označením Arduina, já mám Arduino očíslované, takže adresáře jsou Ard0, Ard1 atd.
V nich je pak Makefile a sketch (REL.ino jako příklad)

pokud v tomto adresáři spustím příkaz make upload
vytvoří se složka build-xxy a sketch se nahraje do Arduina.
Arduino 0 a 1 : Spínání relé
Popis:
V tomto jednoduchém sketchi jsou použité knihovny SPI.h, Ethernet.h a PubSubClient.h. V adresáři pro Arduino se musí nacházet Makefile (název souboru) s obsahem níže. Zde je uvedeno, jaké knihovny budeme načítat a kde jsou umístěny. Knihovny můžete pogooglit a stáhnout. Dále je v Makefile jednoznačná specifikace Arduina, já používám specifický název, jak se Arduino hlásí na cestě /dev/serial/by-id/usb-Arduino... V sketchi jsou pak deklarované proměnné (piny), na kterých jsou připojeny jednotlivé relé desky a logika odposlechu MQTT pro akci, nějaký reconnect, atd. Sketch je víceméně upravený z nějakého blogu, bohužel už jsem nedohledal přesný zdroj.
Makefile
ARDUINO_DIR = /usr/share/arduino
BOARD_TAG = mega2560
ARDUINO_PORT = /dev/serial/by-id/usb-Arduino__www.arduino.cc__0042_85531303630351119291-if00
USER_LIB_PATH = /usr/share/arduino/libraries
ARDUINO_LIBS = Ethernet SPI pubsubclient
include /usr/share/arduino/Arduino.mk
Example sketch
/*
Example MQTT-switch-relay script
- connects to an MQTT server
- publishes "hello world" to the topic "relay"
- subscribes to the topic "relay"
- controls as many relays as defined
- turns on/off a specific led when it receives a specific "on"/"off" from the "relay" topic
- multiple arduino's with same generic sketch can run parallel to each other
- multiple arduino's need each to have a unique ip-addres, unique mac address and unique MQTT client-ID
- tested on arduino-mega with W5100 ethernet shield
*///------------------------------------------------------------------------------
#include <SPI.h>
#include <Ethernet.h>
#include <PubSubClient.h>// Set relay variables to Arduino digital pins
//X1
int Rel_X1_1 = 41;
int Rel_X1_2 = 49;
int Rel_X1_3 = 47;
// Set variables to act as virtual switches
// Set variable values initially to LOW (and not HIGH)//X1
int ValueX1_1 = LOW;
int ValueX1_2 = LOW;
int ValueX1_3 = LOW;
//---------------------------------------------------------------------------// Arduino MAC address must be unique for every node in same network
// To make a new unique address change last letter
// Arduino 0
byte mac[] = { 0xCC, 0xFA, 0x06, 0xCB, 0x19, 0x00 };// Unique static IP address of this Arduino 0
IPAddress ip(192,168,4,30);
// IP Address of your MQTT broker (OpenHAB server)
byte server[] = { 192,168,4,40 };// Handle and convert incoming MQTT messages ----------------------------------------
void callback(char* topic, byte* payload, unsigned int length) {
// handle message arrived
String content="";
char character;
for (int num=0;num<length;num++) {
character = payload[num];
content.concat(character);
}
// Set specific virtual switches on basis of specific incoming messages ----------------------------
//REL1
if (content == "X1_1on") { ValueX1_1 = HIGH; }
if (content == "X1_1off"){ ValueX1_1 = LOW; }
if (content == "X1_2on") { ValueX1_2 = HIGH; }
if (content == "X1_2off"){ ValueX1_2 = LOW; }
if (content == "X1_3on") { ValueX1_3 = HIGH; }
if (content == "X1_3off"){ ValueX1_3 = LOW; }
// Set digital pin states according to virtual switch settings
digitalWrite(Rel_X1_1, ValueX1_1);
digitalWrite(Rel_X1_2, ValueX1_2);
digitalWrite(Rel_X1_3, ValueX1_3);
}// Initiate instances -----------------------------------
EthernetClient arduino0;
PubSubClient client(server, 1883, callback, arduino0);
//-------------------------------------------------------
void setup()
{
digitalWrite(Rel_X1_1, HIGH);
pinMode(Rel_X1_1,OUTPUT);
digitalWrite(Rel_X1_2, HIGH);
pinMode(Rel_X1_2,OUTPUT);
digitalWrite(Rel_X1_3, HIGH);
pinMode(Rel_X1_3,OUTPUT);
// Setup ethernet connection to MQTT broker
Ethernet.begin(mac, ip);
if (client.connect("arduino0")) { // change as desired - clientname must be unique for MQTT broker
client.publish("relay","hello world - here arduino0 ip 192.168.4.40");
Serial.println("connected");
client.subscribe("relay"); // subscribe to topic "led"
}
}
//-----------------------------------------------
long lastReconnectAttempt = 0;boolean reconnect() {
if (client.connect("arduino0")) {
// Once connected, publish an announcement...
client.publish("relay","reconnected");
// ... and resubscribe
client.subscribe("relay");
}
return client.connected();
}
//----------------------------------------------void loop()
{
if (!client.connected()) {
long now = millis();
if (now - lastReconnectAttempt > 5000) {
lastReconnectAttempt = now;
// Attempt to reconnect
if (reconnect()) {
lastReconnectAttempt = 0;
}
}
} else {
// Client connectedclient.loop();
}
}// End of sketch ---------------------------------
OpenHAB Items - relay.items
/*S/01a*/ Switch Light_Gar_1 "Garden Light 1" /*(Gar, Lights, AwayHomeON) [ "Switchable" ] {mqtt=">[mymosquitto:relay:command:ON:X1_1on],>[mymosquitto:relay:command:OFF:X1_1off]"}*/
/*S/01b*/ Switch Light_Gar_2 "Garden Light 2" /*(Gar, Lights, AwayHomeON) [ "Switchable" ] {mqtt=">[mymosquitto:relay:command:ON:X1_2on],>[mymosquitto:relay:command:OFF:X1_2off]"}*/
/*S/01c*/ Switch Light_Gar_3 "Garden Light 3" /*(Gar, Lights, AwayHomeON) [ "Switchable" ] {mqtt=">[mymosquitto:relay:command:ON:X1_3on],>[mymosquitto:relay:command:OFF:X1_3off]"}*/
Arduino 2 : Pohybové sensory
Popis:
V tomto jednoduchém sketchi jsou použité knihovny SPI.h, Ethernet.h a PubSubClient.h. V adresáři pro Arduino se musí nacházet Makefile (název souboru) s obsahem níže. Zde je uvedeno, jaké knihovny budeme načítat a kde jsou umístěny. Knihovny můžete pogooglit a stáhnout. Dále je v Makefile jednoznačná specifikace Arduina, já používám specifický název, jak se Arduino hlásí na cestě /dev/serial/by-id/usb-Arduino... V sketchi jsou pak deklarované proměnné (piny), na kterých jsou připojeny jednotlivé PIR senzory a logika posílání MQTT + nějaký reconnect. Senzory posílají MQTT alarm, který je zpracovávan v OpenHAB - Rules anebo rovnou rozsvěcují světla (např. koupelna, spíž, atd.).
Makefile
ARDUINO_DIR = /usr/share/arduino
BOARD_TAG = mega2560
ARDUINO_PORT = /dev/serial/by-id/usb-Arduino__www.arduino.cc__0042_85531303630351113112-if00
USER_LIB_PATH = /usr/share/arduino/libraries/
ARDUINO_LIBS = Ethernet SPI pubsubclient
include /usr/share/arduino/Arduino.mk
Sketch
/* A Mash up of TWO example sketches thank you guys...
* When the PIR sensor senses motion it publishes to serial and to MQTT.
* Uses Knolleary's awesome pubsubclient http://pubsubclient.knolleary.net/index.html
//////////////////////////////////////////////////
//making sense of the Parallax PIR sensor's output
//////////////////////////////////////////////////
Determines the beginning and end of continuous motion sequences.The sensor's output pin goes to HIGH if motion is present.
However, even if motion is present it goes to LOW from time to time,
which might give the impression no motion is present.
This program deals with this issue by ignoring LOW-phases shorter than a given time,
assuming continuous motion is present during these phases.*/
/*
It connects to an MQTT server then:It will reconnect to the server if the connection is lost using a blocking
reconnect function. See the 'mqtt_reconnect_nonblocking' example for how to
achieve the same result without blocking the main loop.*/
#include <PubSubClient.h>
#include <Ethernet.h>// Network Settings
// MAC address of ethernet shield
byte mac[] = { 0xCC, 0xFA, 0x00, 0xCB, 0x19, 0x05 };
// IP Static
IPAddress ip(192 ,168 ,4 ,41); //added for fixed ip
// Gateway
IPAddress gateway(192 ,168 ,4 ,1); //added for fixed ip
// MQTT server
byte server[] = {192 ,168 ,4 ,30};
void callback(char* topic, byte * payload, unsigned int length) {
}EthernetClient arduino2;
PubSubClient client(server, 1883, callback, arduino2);//Ground Floor
int p101 = 2; //the digital pin connected to the PIR sensor's pin
int p102 = 3; //the digital pin connected to the PIR sensor's pin
int p103 = 4; //the digital pin connected to the PIR sensor's pin
int p104 = 5; //the digital pin connected to the PIR sensor's pin
int p106 = 6; //the digital pin connected to the PIR sensor's pin
int p108 = 7; //the digital pin connected to the PIR sensor's pin
int p109 = 8; //the digital pin connected to the PIR sensor's pin//First state
int p101state = LOW;
int p102state = LOW;
int p103state = LOW;
int p104state = LOW;
int p106state = LOW;
int p108state = LOW;
int p109state = LOW;// No motion detected at start
int val101 = 0;
int val102 = 0;
int val103 = 0;
int val104 = 0;
int val106 = 0;
int val108 = 0;
int val109 = 0;void setup() {
// Setup ethernet connection to MQTT broker
Ethernet.begin(mac, ip, gateway);
if (client.connect("arduino2")) { // change as desired - clientname must be unique for MQTT broker
client.publish("relay","Hello world - here arduino ip 192.168.4.41");
Serial.println("connected");
client.subscribe("relay"); // subscribe to topic "led"
}
pinMode(p101, INPUT);
pinMode(p102, INPUT);
pinMode(p103, INPUT);
pinMode(p104, INPUT);
pinMode(p106, INPUT);
pinMode(p108, INPUT);
pinMode(p109, INPUT);}
void loop() {
client.loop();
//1.01 - Light + Alarm (Vestibule)
val101 = digitalRead(p101);
if (val101 == HIGH) { // check if the input is HIGH
//client.publish("relay","X2_1on");
client.publish("alarm","alarm101ON");
if (p101state == LOW) {
// we have just turned on
p101state = HIGH;
}
} else {
//client.publish("relay","X2_1off");
client.publish("alarm","alarm101OFF");
if (p101state == HIGH){
// we have just turned of
p101state = LOW;
}
}
//1.08 - Light+Alarm (Koupelna přízemí)
val108 = digitalRead(p108);
if (val108 == HIGH) {
client.publish("relay","X1_7on"); //turn on light when motion detected
client.publish("alarm","alarm108ON");
if (p108state == LOW) {
p108state = HIGH;
}
} else {
client.publish("relay","X1_7off"); // turn off light
client.publish("alarm","alarm108OFF");
if (p108state == HIGH){
// we have just turned of
p108state = LOW;
}
}
delay(1000);}
OpenHAB Items Example - alarms.items
Switch Alarm3 "Alarm Chodba" (Sockets) {mqtt="<[mymosquitto:alarm:command:ON:alarm101ON],<[mymosquitto:alarm:command:OFF:alarm101OFF]"}
Switch Alarm5 "Alarm Koupelna" (Sockets) {mqtt="<[mymosquitto:alarm:command:ON:alarm107ON],<[mymosquitto:alarm:command:OFF:alarm107OFF]"}
OpenHAB Rules Example - alarms.rules
rule "Alarm3 - Chodba"
when
Item Alarm3 changed from OFF to ON
then
if (AwayHome.state == ON)
{
sendMail("vas@email.cz","from openhab","Alarm Chodba")
}
end
rule "Alarm5 - Koupelna"
when
Item Alarm5 changed from OFF to ON
then
if (AwayHome.state == ON)
{
sendMail("vas@email.cz","from openhab","Alarm Koupelna")
}
end
Arduino 3 - Vypínače
Popis:
Tento sketch je velice primitivní, ale zatím mi to funguje dle potřeby. Lze jej jakkoliv vylepšit i na akci vícenásobných stisknutí tlačítek atp. V tomto jednoduchém sketchi jsou použité knihovny SPI.h, Ethernet.h a PubSubClient.h. V adresáři pro Arduino se musí nacházet Makefile (název souboru) s obsahem níže. Zde je uvedeno, jaké knihovny budeme načítat a kde jsou umístěny. Knihovny můžete pogooglit a stáhnout. Dále je v Makefile jednoznačná specifikace Arduina (změňte), já používám specifický název, jak se Arduino hlásí na cestě /dev/serial/by-id/usb-Arduino... V sketchi jsou pak deklarované proměnné (piny), na kterých jsou připojeny jednotlivé vypínače a logika zasílání MQTT + nějaký reconnect. MQTT je zpracováván v OpenHAB Rules. Sketch je víceméně opět upravený z předchozích.
Makefile
ARDUINO_DIR = /usr/share/arduino
BOARD_TAG = mega2560
ARDUINO_PORT = /dev/serial/by-id/usb-1a86_USB2.0-Serial-if00-port0
USER_LIB_PATH = /usr/share/arduino/libraries/
ARDUINO_LIBS = Ethernet SPI pubsubclient
include /usr/share/arduino/Arduino.mk
Sketch
/*
Example MQTT-switch-relay-node with buttons
- connects to an MQTT server
- publishes "hello world" to the topic "relay"
- subscribes to the specific topic
- sends a specific "on"/"off" to the specific topic a specific button is pressed
- multiple arduino's with same generic sketch can run parallel to each other
- multiple arduino's need each to have a unique ip-addres, unique mac address and unique MQTT client-ID- tested on arduino-mega with W5100 ethernet shield
*/
//------------------------------------------------------------------------------
#include <SPI.h>
#include <Ethernet.h>
#include <PubSubClient.h>// MAC address of ethernet shield (DHCP automatically set IP)
byte MAC_ADDRESS[] = { 0xCC, 0xFA, 0x01, 0xCB, 0x19, 0x09 };
IPAddress ip(192, 168, 4, 42); //added for fixed ip
IPAddress gateway(192, 168, 4, 1); //added for fixed ip// IP address of MQTT server (OpenHAB Server)
byte MQTT_SERVER[] = { 192, 168, 4, 30 };
int butX2_1 = 3;
int butX1_6 = 8;
int butX1_7 = 5;
int butX2_8 = 7;
int butX2_7 = 6;
int butX2_6 = 9;
void callback(char* topic, byte* payload, unsigned int length) {
// handle message arrived (no messages expected though)
}
EthernetClient arduino3;
PubSubClient client(MQTT_SERVER, 1883, callback, arduino4);//-------------------------------------------------------
//Priprava tlacitekvoid setup(){
Ethernet.begin(MAC_ADDRESS,ip,gateway);
if (client.connect("arduino3")) {
client.publish("relay", "Arduino 3 connected IP 192.168.4.42");
}pinMode(butX2_1, INPUT);
digitalWrite(butX2_1, HIGH);
pinMode(butX1_6, INPUT);
digitalWrite(butX1_6, HIGH);
pinMode(butX1_7, INPUT);
digitalWrite(butX1_7, HIGH);
pinMode(butX2_6, INPUT);
digitalWrite(butX2_6, HIGH);
pinMode(butX2_7, INPUT);
digitalWrite(butX2_7, HIGH);
pinMode(butX2_8, INPUT);
digitalWrite(butX2_8, HIGH);
}
//-----------------------------------------------
long lastReconnectAttempt = 0;boolean reconnect() {
if (client.connect("arduino3")) {
// Once connected, publish an announcement...
client.publish("relay","reconnected");
}
return client.connected();
}
//----------------------------------------------
//Priprava tlacitek
void loop()
{
// read the pushbutton input pin:
if (digitalRead(butX2_1)==LOW){
client.publish("butX2_1","pressed");
delay(2000);
}
if (digitalRead(butX1_6)==LOW){
client.publish("butX1_6","pressed");
delay(2000);
}
if (digitalRead(butX1_7)==LOW){
client.publish("butX1_7","pressed");
delay(2000);
}
if (digitalRead(butX2_6)==LOW){
client.publish("butX2_6","pressed");
delay(2000);
}
if (digitalRead(butX2_7)==LOW){
client.publish("butX2_7","pressed");
delay(2000);
}
if (digitalRead(butX2_8)==LOW){
client.publish("butX2_8","pressed");
delay(2000);
}
delay(50);
if (!client.connected()) {
long now = millis();
if (now - lastReconnectAttempt > 5000) {
lastReconnectAttempt = now;
// Attempt to reconnect
if (reconnect()) {
lastReconnectAttempt = 0;
}
}
} else {
// Client connectedclient.loop();
}
}// End of sketch ---------------------------------
OpenHAB Items - buttons.items
String ButPresX2_1 {mqtt="<[mymosquitto:butX2_1:state:default]"}
String ButPresX1_7 {mqtt="<[mymosquitto:butX1_7:state:default]"}
OpenHAB Rules - buttons.rules
/*Chodba*/
rule "ButonnPressX2_1"
when
Item ButPresX2_1 received update
then
if(Light_GF_Corridor_Vest.state == ON{
sendCommand(Light_GF_Corridor_Vest, OFF)
}else{
sendCommand(Light_GF_Corridor_Vest, ON)
}
end/*Koupelna přízemí */
rule "ButonnPressX1_7"
when
Item ButPresX1_7 received update
then
if(Light_GF_Toilet_Ceiling.state == ON{
sendCommand(Light_GF_Toilet_Ceiling, OFF)
}else{
sendCommand(Light_GF_Toilet_Ceiling, ON)
}
end
Arduino 4 - Žaluzie
Popis:
V tomto jednoduchém sketchi jsou použité knihovny SPI.h, Ethernet.h a PubSubClient.h. V adresáři pro Arduino se musí nacházet Makefile (název souboru) s obsahem níže. Zde je uvedeno, jaké knihovny budeme načítat a kde jsou umístěny. Knihovny můžete pogooglit a stáhnout. Dále je v Makefile jednoznačná specifikace Arduina, já používám specifický název, jak se Arduino hlásí na cestě /dev/serial/by-id/usb-Arduino... V sketchi jsou pak deklarované proměnné (piny), na kterých jsou připojeny jednotlivé relé desky a logika odposlechu MQTT pro akci, nějaký reconnect, atd. Sketch je víceméně upravený z nějakého blogu, bohužel už jsem nedohledal přesný zdroj. Pro žaluzie je vždy potřeba dvě relé. Jedno spíná motor nahoru druhý dolů. Nikdy se nesmí potkat zapnuté obě relé viz sketch. Po stisknutí tlačítka nahoru nebo dolů je možné nastavit dobu kdy napájení motoru vypnout - Rules.
Makefile
ARDUINO_DIR = /usr/share/arduino
BOARD_TAG = mega2560
ARDUINO_PORT = /dev/serial/by-id/usb-Arduino__www.arduino.cc__0042_85531303630351119291-if00
USER_LIB_PATH = /usr/share/arduino/libraries
ARDUINO_LIBS = Ethernet SPI pubsubclient
include /usr/share/arduino/Arduino.mk
Example sketch
/*
Script to control relay via MQTT
- connect to MQTT server
- publishes "Hello world - Arduino XYZ" to the topic "shutters"
- subscribes to the topic "shutters"
- controls as many relays as defined
- turns on/off a specific led when it receives a specific "on"/"off" from the "shutters" topic
- protect to turn on both relay regarding to specific shutter
- multiple arduino's with same generic sketch can run parallel to each other
- multiple arduino's need each to have a unique ip-addres, unique mac address and unique MQTT client-ID
- tested on arduino-mega with W5100 ethernet shield
*/
//------------------------------------------------------------------------------
#include <SPI.h>
#include <Ethernet.h>
#include <PubSubClient.h>// Set relay variables to Arduino digital pins
//X1
int Rel_X1_1 = 41;
int Rel_X1_2 = 49;
// Set variables to act as virtual switches
// Set variable values initially to LOW (and not HIGH)//X1
int ValueX1_1 = LOW;
int ValueX1_2 = LOW;
//---------------------------------------------------------------------------// Arduino MAC address must be unique for every node in same network
// To make a new unique address change last letter
// Arduino 0
byte mac[] = { 0xCC, 0xFA, 0x06, 0xCB, 0x19, 0x00 };// Unique static IP address of this Arduino 0
IPAddress ip(192,168,4,39);
// IP Address of your MQTT broker (OpenHAB server)
byte server[] = { 192,168,4,40 };// Handle and convert incoming MQTT messages ----------------------------------------
void callback(char* topic, byte* payload, unsigned int length) {
// handle message arrived
String content="";
char character;
for (int num=0;num<length;num++) {
character = payload[num];
content.concat(character);
}
// Set specific virtual switches on basis of specific incoming messages ----------------------------
//REL1
if (content == "X1_1on") { ValueX1_2 = LOW; ValueX1_1 = HIGH; }
if (content == "X1_1off"){ ValueX1_1 = LOW; }
if (content == "X1_2on") { ValueX1_1 = LOW; ValueX1_2 = HIGH; }
if (content == "X1_2off"){ ValueX1_2 = LOW; }
// Set digital pin states according to virtual switch settings
digitalWrite(Rel_X1_1, ValueX1_1);
digitalWrite(Rel_X1_2, ValueX1_2);
}// Initiate instances -----------------------------------
EthernetClient arduino0;
PubSubClient client(server, 1883, callback, arduino0);
//-------------------------------------------------------
void setup()
{
digitalWrite(Rel_X1_1, HIGH);
pinMode(Rel_X1_1,OUTPUT);
digitalWrite(Rel_X1_2, HIGH);
pinMode(Rel_X1_2,OUTPUT);
// Setup ethernet connection to MQTT broker
Ethernet.begin(mac, ip);
if (client.connect("arduino0")) { // change as desired - clientname must be unique for MQTT broker
client.publish("relay","hello world - here arduino0 ip 192.168.4.40");
Serial.println("connected");
client.subscribe("relay"); // subscribe to topic "led"
}
}
//-----------------------------------------------
long lastReconnectAttempt = 0;boolean reconnect() {
if (client.connect("arduino0")) {
// Once connected, publish an announcement...
client.publish("relay","reconnected");
// ... and resubscribe
client.subscribe("relay");
}
return client.connected();
}
//----------------------------------------------void loop()
{
if (!client.connected()) {
long now = millis();
if (now - lastReconnectAttempt > 5000) {
lastReconnectAttempt = now;
// Attempt to reconnect
if (reconnect()) {
lastReconnectAttempt = 0;
}
}
} else {
// Client connectedclient.loop();
}
}// End of sketch ---------------------------------
OpenHAB Items - shutters.items
/*X1*/ Rollershutter X1 "Obývák" (GF_Living Group, Rollershutters) {mqtt=">[mosquitto:shutters:command:UP:X1_1on],>[mosquitto:shutters:command:DOWN:X1_2on],>[mosquitto:shutters:command:STOP:X1_1off],>[mosquitto:shutters:command:STOP:X1_2off]"}
OpenHAB Rules - shutters.rules
/*==Rules to STOP power motor after time period (10 second in example) ==*/
rule "X1 rollershutter UP"
when
Item X1 received command UP
then
timer = createTimer(now.plusSeconds(10),
[| sendCommand( X1, STOP)
])
endrule "X1 rollershutter DOWN"
when
Item X1 received command DOWN
then
timer = createTimer(now.plusSeconds(10),
[| sendCommand( X1 STOP)
])
end
Kompletní sketche pro modelový dům pro desky Arduino Mega najdete v tutoriálu našeho projektu OpenTUX zde.
Líbil se Vám článek? Podpořte nás.


")
